Thursday, December 30, 2010

Sheathing


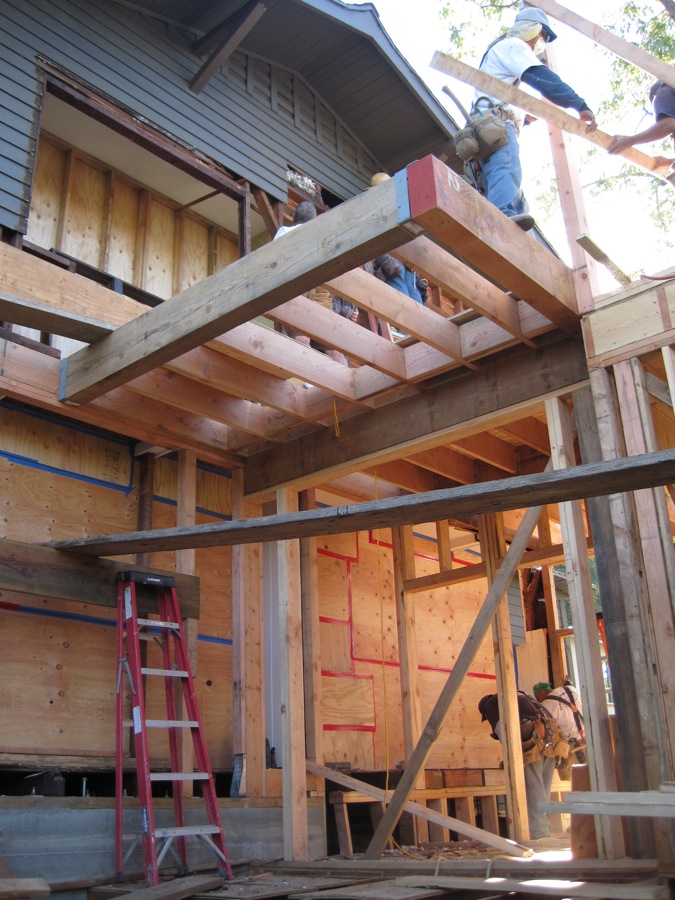
With all the framing complete the crew can start sheathing - attaching plywood to the roof and walls.  There are some walls that are indicated by the Structural Engineer that need "Shear Walls."  In these areas the plywood needs to be nailed very precisely and is indicated on his drawings.  For example the nails are 4" apart at the perimeter and 10" apart at the midspan.  The size of the shaft of the nail is also specified and he has calculated the exact strength of the entire assembly based on the building code.  These walls protect the house from racking or moving laterally in a seismic event.  At the end of the shearwalls there are also larger framing members - for example if the wall is designed using 2x4 studs the end of the shearwalls will have 4x4 posts.  The posts are connected to the beams below with a large steel brace called a hold down.  The hold down protects the house from the up and down movement during a seismic event.


Most of the walls and all the roof is plywooded - but unfortunately the day after it started raining for a week - The crew has tarped the construction the keep the interior wood as dry as possible - considering the scale of the storm and the fact that these are wind-driven rains.


Rain comes in at all the window openings...


The tarp covering a joint where the roofs come together in such a way that the gap will later be glazed...


The crew makes a "to do" list with some if the final items for rough framing in preparation for a meeting with the Structural Engineer...


View from Family Room window of the storm...

The rains have finally taken a little breather - they still come every few days so we do what we can in-between.  The crew frames the last wall that was demolished on the existing house...These walls get a "double shear wall."  They are not long enough to calc out with plywood on one side so they get plywooded on both sides...


Time to get ready for the windows to get installed...The windows were scheduled for delivery when the rain started but we didn't want to risk them getting warped.  With a day of sunshine predicted we arrange for the window delivery so that we can prime them before they get installed.  It is important that the outside face of the jambs get primed before they go in because that side gets attached to the framing.  Once it is attached if it is not sealed with primer the wood could absorb water and warp....That's my painting crew - Daddy and Ella...


The windows are primed and the opening are cleaned up. A huge wind storm has come through with 60 MPH winds so we lay the windows flat.  Tomorrow some of the trickier windows are getting installed by a window installer who specialized in tricky windows.  Next week the framer will install the rest of them which are more standard.


Above - Master Bedroom corner window which gets a glass miter...
Below - the glass and mitered jambs waiting to be installed...


The plumbers were also able to begin work this week - they install all of the piping that requires gravity both down and up to work.  The sewer lines for down and the vents for up.  They go before the mechanical and electrical sub-contractors because gravity has it's own will.  The ducts are forced air so they can go anywhere that fits (with a few rules - like not too many bends) and the electricity of course can wire itself around obstacles as well.  Everything has been dimensioned and layed out so that it will finish in the right place.  The duct runs and chases have been built.

The toilet rough-in ...

The vent pipes for the shower, toilet, and sink...


Saturday, December 11, 2010

Framing Second floor - Walls and Roof


Now that the floor sheathing is on the second floor they can begin demolishing the second floor exterior walls.


The beams for the second story headers are long and have a big cross-section - getting them from the ground to the second floor is tricky and takes a lot of guys.  This is one of the heaviest beams - it is a 6x14 header for a large accordian folding door that is 9'-0" wide by 7'-0" high.

...It is also the first beam to go up because it will help to determine the location of one of the roofs ridge beams.

Now the other headers can go up - these are based off of the heights of the existing ceiling and roofs and the crew can track the rest of the walls around the perimeter based on these heights.

Once the crew knows what height to frame the walls to they frame them very quickly...


Next the ridge beams go up for the Family Room Roof.  We had to maintain the existing building height and even dropped it down a few feet because we have a special zoning code ordinance in our area regulating building heights called the "Hillside Ordinance."

Once the ridge beam is up the crew frames in the roof rafters.


The roof rafters for the Family Room are complete.  There is a slightly more complex roof over the new kitchen sitting area and exterior deck.  In this area the ridge bream drops diagonally from the existing roof ridge to the approximate center of the new Family Room.  Because the ridge is at an angle to a constant slope it will be lower at it's end point and each rafter will need to be a different length...that's for next week!


Monday, December 6, 2010

Framing the Second Floor

Last week the crew framed the second floor floor joists which involved installing a lot of hardware again.

The first beams to go up span across the ceiling of the Master Bedroom. They are very large 6x12 beams because they have to not only span the Bedroom but also past it by 2' picking up a portion of cantilevered space in the Family Room above.  A cantilever is any span that is unsupported at it's end point.  2' May not seem like a big cantilever but there is also a window below so the last column lending support to that beam is about 7' in from the corner of the room above.


The remaining floor/ceiling joists are framed in but we are still waiting on some special hardware for the four cantilever beams.

The offset hangers for the cantilever beams arrive and now the crew can install one of the beams and also the floor joists that get framed into it.

Now that most of the joists are in the crew begins to plywood  the second floor.

A second set of cantilever beams support a 5' deep deck that will be outside of the kitchen to the North.  But before they can finish framing this portion of floor a lot has to happen...The back wall of the lower bedroom needs to come off so that a beam which is flush to the face of the existing wall can be installed.  Before that can happen the shoring needs to go back up!

With the shoring up the crew can take out a large portion of the wall and frame in the new beam.  Now they can finish the second floor joists and start working on laying out the walls and roof!

The sill plates go on first showing where the walls will go.  The hardest part about framing these walls is calculating out all their heights.  The new roof matches the existing in some places but is installed at an angle - testing our geometry capabilities.  With a little number crunching and surveying the heights are determined. 

Standing in our future Family Room... 


Wednesday, November 24, 2010

First Floor Framing


This week the crew layed out the first floor and framed most of the walls.

Chillo lays out the floor plan by measuring and marking the layout on the plywood and snapping lines with colored chalk. The crew then attaches the sill plate and top plate of the walls to the plywood and transfers the layout to the plates.


Framing notes on the plywood...this is where a
window is going.
sketch of a window

The orange lines are the chalk dust
The other colors are showing where the wood studs
and columns should be framed.


The crew turns the sill plates on their
sides and use the framing notes to attach
wood studs to the top and bottom plates.


When two perpendicular walls are done
they lift them into place and nail them.


Holding the walls in place while they are nailed.

The second wall gets lifted into place.


After one day half the walls are up.


After the second day all but one of the first floor walls are framed...below is a view from the corner window of the Master Bedroom.  The stud in the corner is bracing the walls until the beams are framed above.  Eventually the window that goes in here has no corner mullion so that the view will be clear.


View of South wall first floor framed...


Bea and Ella in the Master Bedroom...


View from Bedroom to Bathroom


View from new lower hallway to side yard - after the framing is done there is going to be a lot of grading to do and several garden walls to make to navigate the slopes of the back yard.